This is the fifth of probably fourteen posts, each chronicling in detail the ins and outs of my Robotics class…
That’s how I normally begin posts in this series. This is a short digression to help explain why it’s probably going to be less than fourteen. Feel free to skip past this bold bit if you purely want to read about teaching Robotics in the classroom.
In the middle of week 4 I was got sick and was out for two days, though the conditions followed me for quite a while. The unit chronicled in this post actually took longer than a week to finish. Then testing hit. All educators in the US (and probably outside of) can attest to the impact that standardized testing has had on their class/curriculum. Not only were some of my classes interrupted in order for the students to take the test, I teach in a computer lab and so I was asked by my Principal if my lab could be used in order for testing (all the tests are done on computers in Washington State) to be finished more quickly in the school. And of course I said yes – I’m a nice guy. 🙂
I was out of my classroom for three days one week for the reading test, and then four days two weeks later for the math test. If you’re counting, that’s a total of nine days (seven for testing and two for sickness) which is almost two full weeks of school. If your school is anything like mine, there are field trips and field days towards the end of the school year and the conflicting directive from administration to make sure we’re teaching meaningful lessons right up to the last day. And in-between I had to clean up my room – Robotics teachers know how difficult this can be, there are literally thousands of LEGO pieces not in their right place. Adding the end of the year interruptions I missed thirteen instructional days overall which is two and a half weeks which probably put me three weeks behind.
My intent here is to be descriptive and not whiny. I’m describing the nature of the beast; which was compounded because I teach trimester instead of semester or year long classes. My principal was quite supportive – he arranged for me to use the gymnasium, and you’ll see in my weeks 5 and 6 blog posts, some pictures and videos of students building robots on the gymnasium floor. This meant carting robots, kits, and LEGO pieces around the building but we made it work. And now back to my usual introduction:
… I teach an introductory course using the LEGO Mindstorms EV3 set. My students are 7th graders who are required to take the course and may not necessarily have any background in programming/building. My school is on a trimester schedule so the course runs for thirteen weeks at a time. For this particular trimester I have one class of twenty-four students and one class of thirty-four students. I meet each class for one 50-minute period each day, five days a week. I have thirty-four computers in my classroom and one EV3 kit for every two students. I’ve been teaching this class in its current form for two years, though I’ve been teaching Robotics for eight all together.
“Knock it Off!” started by borrowing ideas from other people and making them my own. (This is how all good teachers do it right?) In this case it was Damien Kee again. In his wonderful and popular book, Classroom Activities for the Busy Teacher: NXT, Damien had a unit where he had students measure the diameter of their wheels and then calculate the circumference. This information was then used to see how many rotations the robots would need to be programmed for in order to go certain distances.
Here’s how I modified it:
On day one I had the students follow the worksheet, which you can see below. One change you may want to make is to number the questions, so it’s easier to refer to them with the class. After measuring how far the robot traveled in ten rotations, the student is supposed to determine how far it would go in one rotation by dividing by ten. Then the students would measure the diameter and multiply by pi to determine the circumference. There are a lot of teachable moments at this point. Most of my students know diameter and its relation to circumference (all of them are supposed to know it by 7th grade) but there are some to whom the concepts are alien and need to be explained. Then there are those who also need help measuring diameter. You need to make sure you are placing a ruler directly across the center of the wheel and measure to the furthest point on each tire. Some students would just approximate or guess without wanting to squint and count the millimeter lines. At times I can become exasperated with these kids, but then I had to remind myself that they’ve probably never actually measured something with a ruler before. The balloon tires that come with the NXTs are also difficult to measure as they are wider in the center than on the outsides. I have a set of clear plastic rulers which helps.
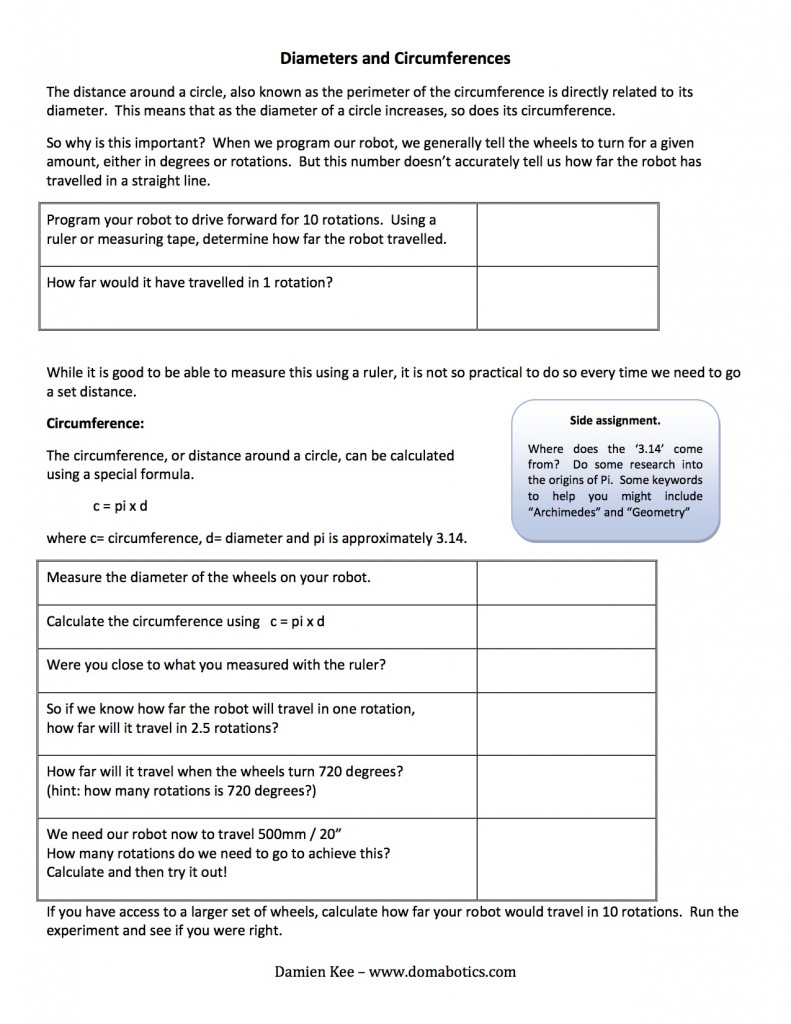 Having students understand that the circumference is equal to one rotation of the wheel is difficult with some. It may require rolling the tires slowly and having the students watch until something in their brain clicks. 🙂 One of the questions towards the bottom of the worksheet asks if the student’s calculated circumference was close to how far they measured their robot when it drove ten rotations (then divided by ten). The numbers should be close, but if they’re not, it’s a good time to have a class discussion about what factors could cause the difference.
The last three questions ask the students to determine how many rotations their robot would need to go to reach a certain distance or how far it would go when programmed a particular number of degrees. And this is where I got the idea for this unit.
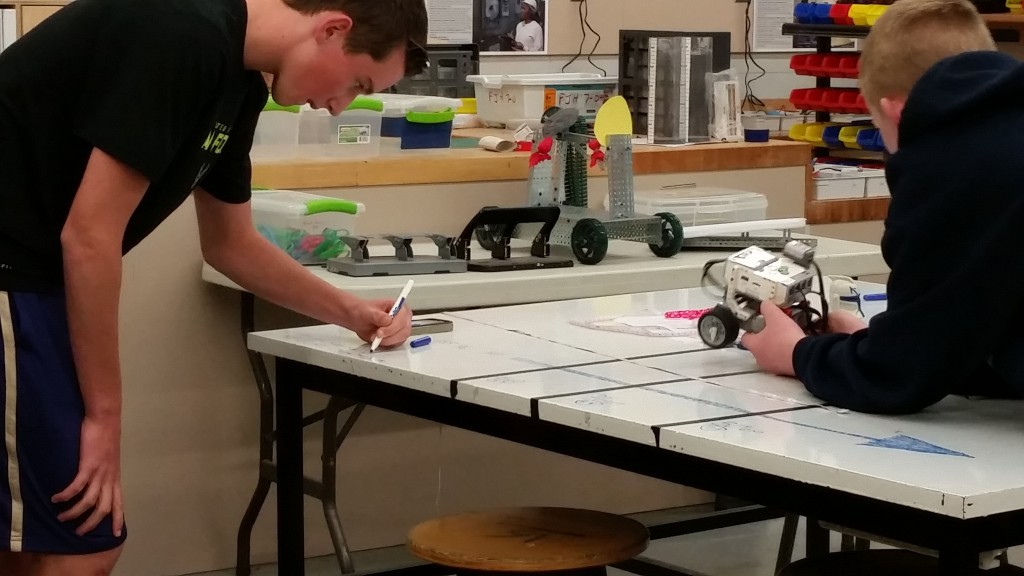
On day two I would have the students take out their worksheets (hint: keep the worksheets in their robotics kits). On the tables in my classroom I would have three pieces of electrical tape (a robotics teacher’s best friend) spread across the tables width-wise at different intervals. I would have the students measure this interval and then we would discuss how to figure out how many rotations to program their robot to go from the tape line to the edge of the table. At the edge of each table I would place the Star Wars toys from McDonalds’ Happy Meals. (I have a lot of these, but that’s another story.)

The students would have to start on one line and program their robot to drive forward to knock off the toy without falling off the edge. Unlike most units in Robotics where I want my students to do multiple iterations, the idea here is to get it right the first time using Math.
Here’s a slow and steady example:
https://youtu.be/YUBgz6Umeps
Notice the little white claw pieces connected to the center axle of the wheel. This is a great piece for students to monitor the rotation of their wheels.
Here’s an example of a robot that went a bit too far:
Usually I give the students two days to to practice measuring the distance, dividing by their circumference, and then programming the robots for the correct duration. While a lot of students will get all three distances fairly quickly, there are some who struggle. To give these students the extra help they need, I have the other students start at the other side of the table (automatically giving them three new distances) or let them combine the distances into one program.
Not every teacher can paint their tables with whiteboard paint, but if you can, it really helps facilitate a lot of on the spot calculations:
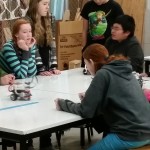
One group had a great discussion, which I was so proud of myself to not interrupt until the end:
This is such a beautiful example of student-to-student interaction and discussion. And you notice the phone in the young lady’s hand – it was being used for calculations. 🙂
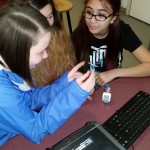
Here’s an example of a teacher (me) not giving students enough time to think and answer:
In order to assess this lesson, what I do the next day is change two factors. I have them put different (usually larger) tires on their robots and I change the distances on the tables by moving the pieces of tape. Then I have them do the same thing but this time I don’t offer any help or assistance or allow the groups to discuss the problems with each other.
One caution with this lesson is to not allow the students to have sensors or other attachments on the front of their robots. It’s too easy to knock the figure off the table without getting close if the front of the robot is too long.
Also in A Week in the Life
Ian Chow-Miller covers the highs and lows of his introductory robotics class for 7th graders.
- A Week in the Life #3: Wave Goodbye
- A Week in the Life #4: Knock It Off!
- A Week In the Life #5: Vroom, Vroom, Up, Up, and Away!
Latest posts by Ian Chow-Miller (see all)
- Using Video to Assess Robotics Students - 21 November 2018
- A Week in the Life #12: Robot Monsters! - 9 February 2017
- A Week in the Life #11: Sumobot to Battlebot - 28 June 2016
- A Week in the Life #10: Candy Sorter - 27 June 2016
- A Week in the Life #9: Walk This Way… - 23 November 2015