 In this article, we look at the difference between fixed and relative thresholds in LabVIEW, that is the “darkness” and the “darker” settings in the Wait for Light Sensor block.
Note: This article builds on “Exploring thresholds” by Josep Fargas. It is recommended that you read that article first.
The examples in this article were written in LabVIEW with the LabVIEW Module for LEGO MINDSTORMS.
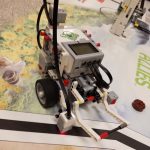
A common exercise in robotics classes consists of having a robot drive on a white surface until it detects a black border and then stop. We might call this “Stop at the line”.
To do this, the robot has to first learn what light sensor readings correspond to the white surface and what readings correspond to the black border.
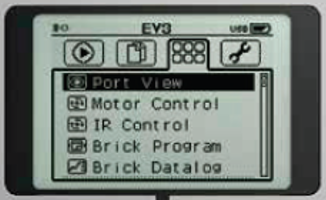 In Port View students can verify the light values for white surface and black border respectively as follows:
- Set EV3 Brick to Port View
- Connect a Color Sensor to sensor port 1
- Set the ports reading to “1: COL-REFLECT”
For example, let’s say that we’ve recorded the following values (remembering that 100% means brightest, and 0% means darkest):
- White surface: 60%
- Black border: 30%
Using these, we can determine an average for the threshold value:
- Threshold: 45%
Note: The average (or midpoint) of the two readings isn’t always the best choice. Students can explore the transition between the white surface and the black border with Port View on their robot and find an optimized threshold as distinction between bright (keeping going forward!) and dark (stop!).
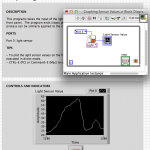
Using a “Wait for Darkness” with a threshold of 45 gives us this LabVIEW program… 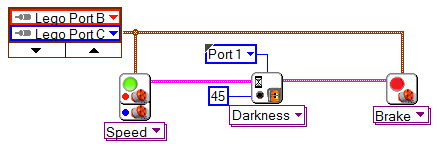
But what happens when the lighting changes in the room? E.g. If the Sun goes behind a cloud?
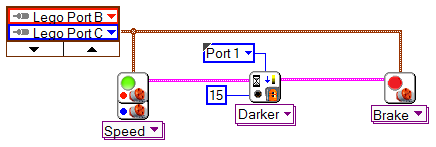
There, however, is an alternative to “Wait for Darkness” that means we don’t have to set a fixed threshold at all, that is “Wait for Darker”. Using this setting, we choose how much darker the light should be until the Wait block considers the light dark enough to react. But how much darker?
Let’s use the previous example:
- White surface: 60%
- Threshold: 45%
- Black border: 30%
The difference between white surface (60%) and the threshold (45%) = 60% – 45% = 15% darker.
Therefore when the robot senses a drop in lighting of more than 15% it will treat this as having found a black border.
When I showed this to my students, it lead to a discussion about what “darker” actually means…
Student: Darker than what?
Teacher: Hmm … darker than actual light conditions.
Student: Well, but how does our robot realize these actual light conditions?
Students’ hypotheses:
At start of program-run?
When light-sensor lights up?
When wait-for-light is activated?
… but that is too late!
… and it’s occupied with watching out for the dark border …
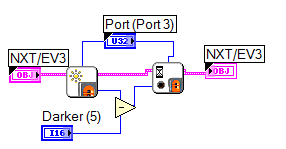
So we investigated the internal coding of the “Wait for Darker” block by double-clicking on it.
This coding shows the guts of “Wait for Darker” block.
Be aware! Inspecting the internal code of a block can be quite interesting, BUT do not change the inner settings because you won’t recognize those changes from an outside view afterwards.
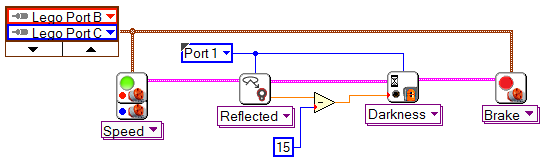
For better understanding I integrated the internal coding above (light-sensing, subtraction minus 15 and wait–for-darkness) into our LabVIEW Program “wait–for-darker”.
- Get Light-Sensor from: Functions > MINDSTORMS Robotics > Sensor (Read EV3 color > reflected)
- Get Subtraction from: Functions > MINDSTORMS Robotics > Programming > Numeric > Subtract.
Student: That’s not much more than we had already!
Teacher: Well, what did they really add in the “Wait for Darker” coding?
The students argued a bit until they understood the meaning of subtraction and then recognized that this coding simply does the same we did ourselves. (Actual light reading minus darker-value = new threshold).
Immediately at start of the “Wait for Darker” function, the Light sensor takes an initial reading. Then as soon as the current light reading is 15 points lower (our setting for darker) than the initial reading, the function has finished waiting for darker and the program proceeds to the next instruction.
This explanation engaged the students into a closer discussion of internal timing in the program and the corresponding behavior of the robot.
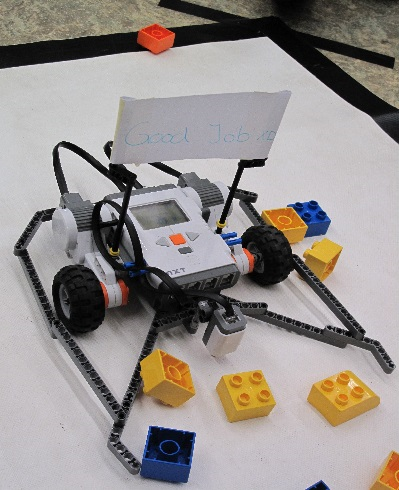
They also argued about what starting position would be best to have a successful program run across the surface.
Can you imagine that starting with the light sensor on the black border won’t be a good choice and why?
By investigating this topic the students gained a deeper understanding of
- how to use a light sensor.
- what we can expect from a wait-for- block.
- the internal timing in the program and the corresponding behavior of the robot. (This is important for debugging skills because quite frequently students can’t imagine which part of the program is responsible for such a strange behavior of their robot.)
Andi Pi
andiPi
Latest posts by andiPi (see all)
- Darkness or darker? - 31 March 2015