Sensors provide robots with information about their environment. With the sensors that come with the EV3, you can make a robot respond to being touched, react when someone or something comes too close, follow a line, or measure how far they have turned.
The selection of sensors in your kit depends on whether you have the Education or Retail version of the EV3 set. See below for a summary of how many of each kind of sensor come with the Education or Retail sets. The EV3 sensors are also available separately (e.g. from your local LEGO Education distributor).
In addition to the standard LEGO EV3 sensors that come with the Education and Retail versions of the EV3 set, it’s worth noting that there are also many third-party sensors available.
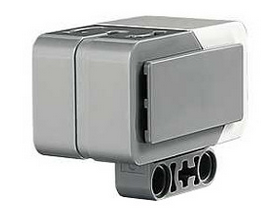
Touch sensor
 The touch sensor gives your robot a sense of touch. The touch sensor detects when it is being pressed or released. It can even be programmed to wait until it is both pressed and released (we call this bumped).
Challenge suggestions
- Create a “cookie clicker”-style game that display the number of times a touch sensor has been pressed.
- Build a robot hand (or venus fly trap!) that closes when something touches it.
- With two touch sensors and a couple of long wires, create a simple remote control.
- Make a robot begin its programmed action when a touch sensor is pressed. This is particularly useful if, for example, the buttons on the EV3 bricks are difficult to reach.
Colour sensor (colour, light)
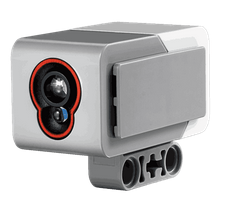 The colour (or color) sensor can detect either the colour or intensity of light.
The colour sensor has three different modes: colour, reflected light intensity, and ambient light intensity.
- Colour – In this mode, the colour sensor can differentiate up to seven different colours: black, blue, green, yellow, red, white, and brown. Each colour is also represented by a value (see “Colour and light data table” below). Note: For best results, the colour sensor needs to be 1-2 cm away from the colour you are trying to detect, and have consistent lighting.
- Reflected light intensity – In this mode, the colour sensor emits a red light and measures the amount reflected back into itself from the surface you are testing. The intensity of the light is measured as a percentage from 0 to 100, with 0 being very dark, and 100 being very bright.
- Ambient light intensity – In this mode, the colour sensor measures the amount of light in its environment, without producing its own light source. Ambient light intensity is measured as a percentage from 0 to 100, with 0 being very dark, and 100 being very bright.
Challenge suggestions
- Sort LEGO bricks based on their colour.
- Drive across different coloured pieces of paper, responding to each colour with a different action
- Create a barcode reader.
- Program your robot to respond to masking tape placed on dark carpet.
- Program a robot to stop when it reaches the edge of a table (ie. it detects no reflected light)
- Follow the edge of a black line on a light background. As with detecting colour, for best results, the colour sensor needs to be between 1-2 cm away from the surface you are trying to measure.
- Program your robot to respond differently based on the amount of light in a room, or if another light source shone onto the robot, such as a torch.
Colour and light data table
| Data | Type | Range | Notes |
|---|---|---|---|
| Colour | Numeric | 0-7 | Used in Colour mode. 0 = No Colour 1 = Black 2 = Blue 3 = Green 4 = Yellow 5 = Red 6 = White 7 = Brown |
| Light | Numeric | 0-100 | Used in Reflected Light Intensity and Ambient Light Intensity modes. Measures light intensity as a percentage, 0 = darkest, 100 = brightest. |
Ultrasonic sensor (distance)
 The ultrasonic sensor measures distance to an object up to a maximum of 255cm (or 100 inches) away. It does this by sending out high frequency sound waves that bounce off any object in range, and measuring how long it takes the sound to return to the sensor. In the software, you can select whether the distance is given in centimetres or inches.
The ultrasonic sensor also has a“listen only” mode that can detect whether another robot is using an ultrasonic sensor nearby. In this mode, the sensor listens for signals but does not send them.
Challenge suggestions
- Program a robot to move around a room, avoiding objects in its path.
- Using “listen only” mode, program a robot to react when it detects another robot operating its ultrasonic sensor nearby.
Gyro sensor (rotation/orientation)
 The gyro sensor detects rotational motion in the plane indicated by the arrows on the top of the sensor housing. The sensor measures the rate of rotation in degrees per second and keeps track of the total angle of rotation in degrees.
Note: When connecting the gyro sensor to your EV3 brick, you should hold it completely still in order to minimise drift. For best results, reset the angle using the reset mode of the gyro sensor block before every angle of motion you want to measure.
Challenge suggestions
- Program your robot to turn a specified angle.
- Program a robot to detect if it has fallen over.
- Display how far your robot has turned.
- Create a balancing robot.
Large and medium motors (rotation)
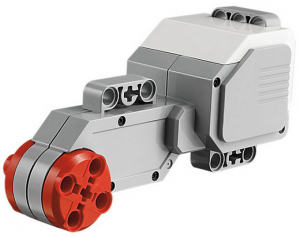 Both the large and medium servo motors are equipped with internal rotation sensors. The rotation sensor is used to measure how far a motor has turned (or has been turned). Rotation sensors can detect an amount of rotation in degrees or full rotations. You can also use the rotation sensor to find out what power level a motor is currently running at.
Challenge suggestions
- Create a combination lock.
- Create a trundle wheel, by attaching a wheel to the motor and using it to display the distance travelled.
- Attach a levers to two motors and create a tank-style remote control for another EV3 robot using bluetooth communication.
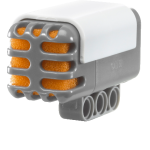
Infrared sensor (distance)
 The infrared sensor can measure distance or detect signals that are sent from the infrared beacon (see below).
The infrared sensor can be used in three different modes: proximity, beacon, and remote.
- Proximity – The infrared sensor sends an infrared signal and detects the reflection of this signal by an object in front of the sensor. The strength of the reflected signal can be used to estimate the distance to the object. Its maximum range is approximately 100 cm.
- Beacon – In this mode, the infrared sensor can detect an infrared beacon, set to beacon mode. The infrared sensor can detect the beacon’s proximity (relative distance from the sensor) and its heading (angle from the direction the sensor is pointing). See the table below for more information.
- Remote – The infrared sensor can detect button presses on the IR beacon. The infrared sensor can detect which button on the remote infrared beacon is pressed. You can also detect when certain combinations of two buttons are pressed at the same time.
Infrared beacon
![]() The Infrared (IR) beacon is an infrared transmitter, and can be used in beacon or remote mode.
The Infrared (IR) beacon is an infrared transmitter, and can be used in beacon or remote mode.
- Beacon mode – In this mode, the beacon transmits an infrared signal continuously until you press the beacon mode button again to turn it off.
- Remote mode – In this mode, the beacon can be used as a remote control.
The infrared sensor will only detect a beacon on the channel specified in the software. If two robots are remote controlled by two different infrared beacons, they should use different channels, otherwise one beacon will control all of the robots on its channel. See “Infrared Sensor Remote Mode Data Table” below for more information.
Note: The beacon mode button acts differently to the other four buttons. When you press the beacon mode button, the beacon starts transmitting continuously until you press it again to turn it off. The other four buttons only transmit when they are held down and stop transmitting when you release them.
Challenge suggestions
- Make your robot seek out and drive towards the infrared beacon.
- Use the infrared beacon as a remote control for your robot.
Infrared sensor beacon mode data table
| Data | Type | Values | Notes |
|---|---|---|---|
| Detected | Logic | True/False | True if an IR beacon is detected on the specified channel, otherwise False. |
| Proximity | Numeric | 0 to 100 | The relative distance to the beacon. 0 means very close, and 100 means far away. The proximity will be 100 if the beacon is not detected at all. |
| Heading | Numeric | -25 to 25 | 0 means the beacon is directly in front of the sensor, negative values are to the left, and positive values are to the right. |
Infrared sensor remote mode data table
| Data | Type | Range | Notes |
|---|---|---|---|
| Button ID | Numeric | 0 – 11 | Identifies which button, or combination of buttons, is pressed on the IR beacon.
0 = No button (and beacon mode is off) |
EV3 Sensors included in the core sets
Here’s a summary of the sensors included in the Education and Retail versions of the EV3 core set.
| Sensor | Education Core Set (45544) | Retail Core Set (31313) |
|---|---|---|
| Touch sensor | 2 | 1 |
| Colour sensor | 1 | 1 |
| Ultrasonic sensor | 1 | 0 |
| Gyro sensor | 1 | 0 |
| Large motor (rotation) | 2 | 2 |
| Medium motor (rotation) | 1 | 1 |
| Infrared (IR) sensor | 0 | 1 |
| Infrared (IR) beacon | 0 | 1 |
Latest posts by John Burfoot (see all)
- Harvey Mk II: Improved Quick EV3 Robot Build - 27 September 2018
- EV3 Sensors - 22 March 2018
- EV3 Simulator using RobotC: QEV3BotSim - 31 October 2016
- Programming Bluetooth on EV3 - 13 April 2015
- Building with RCX/NXT lamps and EV3 pieces - 5 April 2015

help! I did lessons using basic color sensors and using the brick status light. now for a challenge we need to react to a beige color not included and turn on the orange status light or a green flat lego and display the green status light.
the green works and then what do we do?
i tried the ” not” math block and the loop/switch but I am missing something to make it work….
any ideas?
Probably best if we see a screenshot of your code. If you’re on FB, could you please join our group (https://www.facebook.com/groups/LEGOengineering/) and post it there?
If I understood correctly, you are trying to make it react to a beige colour, correct? put a beige colour to the sensor in its port (forgot what it was) record the brightness, and do it by brightness instead of colour.
Good Morning
Can we use dcp logit adapter for nxt, in ev3?
My new (I am new at this) EV3 colour sensor will react to a coloured piece of electrical tape once or twice, then not react at all for a few times, then react again. I have tried raising and lowering the sensor and changing the angle. It never seems to work when it is more than about 2-3 mm away from the colour. Is there a way to adjust the sensitivity? Please help!!!
Hi Drew, I suggest you post your question, preferably with a screenshot of your program and a photo of your robot, to our Facebook group… https://www.facebook.com/groups/LEGOengineering/
Cheers,
Rob