The Wait block is one of the simplest blocks in the EV3 Software, and provides one of the simplest flow control structures. Its basic function is to pause the execution of a program until a particular condition is met, and then continue with the program. For example, “wait until the touch sensor is pressed” or “wait for three seconds”.
But what if you want a program to wait until either of two (or more) possible conditions occur? For example, “wait until EITHER the color sensor detects black OR the touch sensor is pressed”.
This learning sequence explains how the Wait block is built in the EV3 Software, its advantages and limitations, and how to expand its programming functions to accommodate multiple conditions.
Through this learning sequence, students will gain a deeper understanding of:
- how the Wait block works and is implemented in the EV3 software,
- how to use a loop as a flow control structure, and
- the Stop Program block.
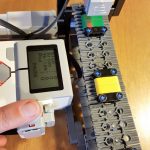
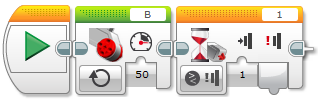
Exercise 1: Wait until a touch sensor is pressed
In the following example, the program waits until a touch sensor is pressed to start a motor for one rotation.

This flow control structure is very useful for keeping a simple program short. Interestingly, many other programming languages do not have anything directly equivalent.
How could we achieve the same function without using a Wait block?
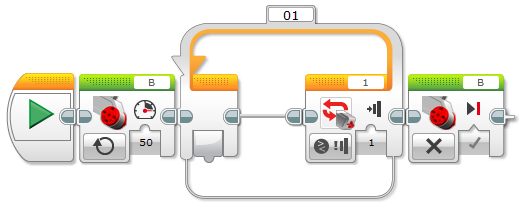
A Wait block is actually just a loop that repeats until a particular condition is met. It’s hidden from the user, but if you could see how the Wait Touch block is implemented within the EV3 Software, it would be equivalent to the Loop block in this example…
Note that a loop can be empty.
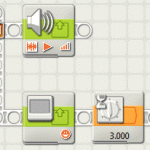
If we want to run a motor forever, can we do it with a wait block?
Yes, but not elegantly. We need to put the Motor block before a Wait block that is set to a condition that will be never met. For example…
If we want to use the touch sensor to stop the motor accurately, we can improve this program by adding a Motor Off block after the Wait Touch block. Set the Motor Off block to Brake at End. For example…

How can we achieve the same function with a loop?
A Loop block can also be set to Unlimited. That is, the loop will never end (unless a Loop Interrupt block is used in another part of the program).
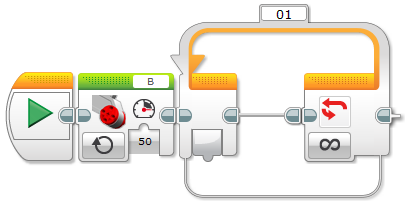
This solution is perhaps more elegant than the earlier one using a Wait block, because it makes explicit that the loop runs forever. Note also that a Wait block doesn’t have an option to set it to Unlimited.
Consider the following program and how it differs from the previous one.
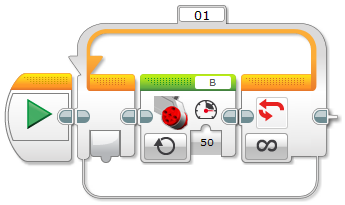
Both programs are equivalent in function, so what are the differences?
The first one only runs the Motor block once, whereas the second runs the Motor block at each iteration of the loop. Although this is less efficient, it is perhaps easier to read and understand. This programming style may be useful to debug long programs.
Exercise 2: Wait for more than one condition
Let’s say we want to wait until EITHER a touch sensor is pressed OR a black color is detected, THEN start a motor.
Can we wait for more than one condition using Wait blocks?
We could do this, but it’s not elegant and has its limitations.
We need to have a separate program sequence for each sensor and use Stop Program blocks to force the program to finish once either of the sequences is done…
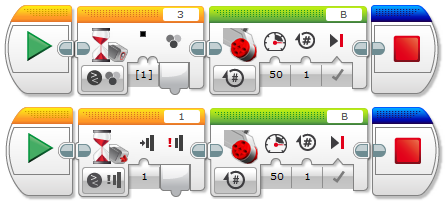
This program might work fine for some situations, but it has some problems…
- We need to explicitly stop the program at the end of each sequence to prevent the rest of the sequences from running.
- Each sequence repeats all the action blocks, in our case, running the motor for one rotation. We should aim to reduce repeated code whenever possible.
- What will happen if immediately after the touch sensor is pressed, the color sensor detects black? The motor will run for more than one rotation.
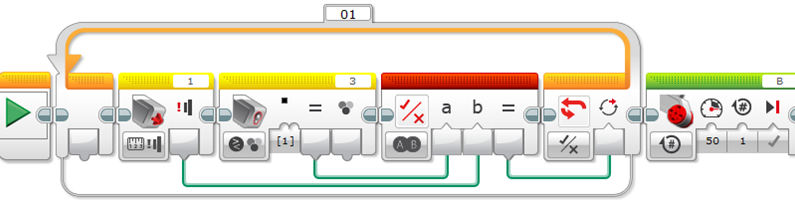
So how can we write a better program?
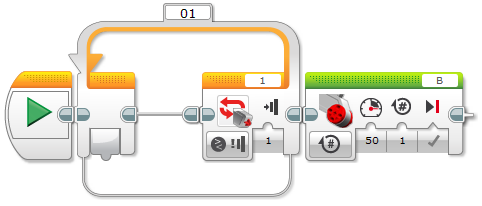
We need to use a loop.
A Loop block can be set to take a Logic value. This way you can use Logic blocks to control it. This is particularly useful if we want to handle more than one condition.
For example, to wait until EITHER a touch sensor is pressed OR a black color is detected, we can wire the results of the sensors into a Logic OR block that, in turn, is wired into the terminating condition of the Loop structure…
Alternatively, we could wait until both conditions are met using a Logic AND block.

If we want to add more conditions, we just need to use more Logic blocks to connect in a chain the sensor outputs of their compare results to the Logic blocks, and connect the last one to the logic input plug of the Loop block.
![]() To find more examples, videos and an introduction course for teachers to Mindstorms EV3 with a translation to Catalan and Spanish, visit the BOGATECH website.
To find more examples, videos and an introduction course for teachers to Mindstorms EV3 with a translation to Catalan and Spanish, visit the BOGATECH website.
Latest posts by Josep Fargas (see all)
- Write Better Code with Design Patterns in EV3 - 14 February 2019
- How to Toggle a Motor On/Off With a Touch Sensor - 16 November 2017
- How to Wait for More than One Sensor Condition - 19 October 2017
- To light or not to light - 7 July 2016
- From Sequential Programming to State Machines - 14 April 2015