Another mentor and I developed the approach described below after we hit several roadblocks trying to show concepts, show programming examples, and then have the students replicate the demonstrated work.
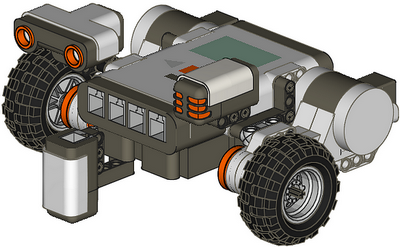
Instead of setting examples and showing the programming in detail, this approach provided the students with only an NXT Domabot with light and ultrasonic sensors, a computer with the NXT Software, a USB cable, and a mission assignment. The adults only helped when asked. We tried to pair more experienced programmers with less experienced ones and that seemed to work well with the middle-school kids.
Although written with NXT in mind, these exercises are platform agnostic for the most part.
I’m sure there could be better exercises, but these seemed to get more enthusiasm than our other efforts and resulted in the students getting more comfortable using sensors. A Microsoft Word version of these is available.
Robot Exercises
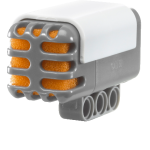
After building the Domabot, direct the students to work through the following sets of missions. Install the color sensor (or light sensor) and ultrasonic sensor. You may need to adjust the height of the light sensor so it is about the width of 2 pennies above the table.
Mission #1. Driving in a Shape
Set up: A smooth horizontal surface.
1a. Make the robot drive in a Square clockwise.
1b. Make the robot drive in a Square counterclockwise.
1c. Make the robot drive in a Square of side length 12 inches (300 mm).
1d. Make the robot drive in various shapes (pentagon, hexagon, octagon, etc.), side lengths, and directions (cw/ccw) as directed by the teacher.
The intent is to have the students understand that each shape can be created with two key actions and as few as three program blocks: drive the length of the side, and make a turn, and repeat. This brings out the following relationships:
– between the robot wheel circumference, motor rotations, and distance
– connecting robot wheel movement with the change in robot heading
– using a loop to simplify repetitive tasks.
Mission #2. Control with Light Sensor
Set up:
- A horizontal smooth surface and contrasting color adhesive tape.
- Base robot with light sensor. A black laboratory table and light colored tape (yellow duct tape, masking tape, etc.) or a light-colored smooth floor and dark tape.
2a. On the surface, drive the robot forward and make it stop on the tape, starting from anywhere on the table.
2b. From the stopping point in the mission above, use information from one of the rotation sensors, back the robot from the line to its starting position, again from anywhere on the table.
Continuing set up: Add two or three more strips of tape, spaced about 6 inches apart – the exercise works better if they are not evenly spaced.
2c. Program the robot to stop on the second yellow line, then third yellow line starting from anywhere on the table.
2d. After stopping on the correct line is mastered, have the robot return to the starting position.
The intent of the first part is to have the students understand how the light sensor can be used to control the robot’s motion: i.e. make it stop. The second part is to show the students that the sensors are providing data to the robot if they understand how to access it. The third and fourth parts are designed to show the students how to monitor a sensor and combine that information with program flow control. The need to return to the starting position can be used to require students to think about the size issues associated with their robot.
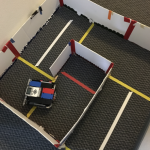
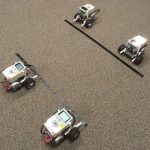
Mission #3. Basic Line Following – Bang Bang Control
Set up:
- A flat smooth surface and contrasting color adhesive tape.
- In middle of the area put down about 2 and half feet of tape.
- Lay down a rough square of tape about 3 – 4 feet on a side.
3a. Make robots follow the edge of the yellow line.
Hint: Line following with a single light/color sensor is almost always more about following the edge of the line than the line itself. Switch motors on or off based on reflected light level and put inside a loop. Use the port view menus on the robot to measure levels of dark and light on each side of the line to develop a threshold figure for the switch.
3b. Make robots follow the edge of the tape for 19 inches (480mm) using a rotation sensor to control how far along the line the robot goes.
The distance isn’t important, but avoid an even multiple of rotations, so no integer multiples of wheel circumference, i.e. ~7 inches (180mm) for the base NXT sets, and it has to go on long enough to be interesting.
3c. Repeat 3.b. but at the end of the 19 inches turn the robot around 180 degrees and return to the starting point – again controlled by information provided by the rotation sensor.
3d. Use the light sensor and sound blocks to give audible feedback for the reflected light intensity while the robot follows the line.
Hint: Add a light sensor block to each branch of the line following program and connect it to a sound block controlling volume or frequency with measured light levels.
3e. Once the instructor is satisfied with the students’ ability to perform basic line following, challenge them to smooth the robot’s motion.
The intent of this section is to drive mastery of basic line following and use the sensors to control the robot’s motion. During discussion with the students the concept of sensor thresholds should be introduced and applied.
Mission # 4. Ultrasonic Sensor Control
Set up: A smooth horizontal surface.
4a. Have the robot move forward and stop at 10 inches from a wall using the ultrasonic sensor.
Hint: Program structure should be very similar to success in Mission #2.a – but with ultrasonic sensor controlling the loop exit or wait for block instead of the light sensor.
4b. Have the robot approach the wall until it reaches a point 10 inches (250mm) from the wall and then turn around and return to the point of beginning.
4c. Have the robot control its speed (stopped, slow, or fast) based on how close the robot is to something in front of it.
4d. As in 4.c., have the robot control its speed (stopped, slow, or fast) based on how close the robot is to something in front of it, but now control the slow speed to be proportional to the distance measured.
4e. As in 4.c. and 4.d. have the robot control its speed (stopped, slow, or fast) based on how close the robot is to something in front of it, but now control the slow speed to be proportional to the distance measured. In addition, have the students smooth the ultrasonic sensor’s distance measurement before allowing the robot to use it.
The intent of the first part is to have the students understand how the ultrasonic sensor can be used to control the robot’s motion: i.e., make it stop. The second part is to show the students that the sensors are providing data to the robot if they understand how to access it. The third and fourth parts incorporates the idea that finer grained control can be attained with a bit more programming effort. Discussion points here include the idea that for industrial-sized applications (like cars and manufacturing equipment) the builders and operators do not want bang-bang control – it needs to be smoothed out. The fifth part forces the noisy data from the sensor to be smoothed before it is used by the robot. For students using NXTs, this will almost certainly smooth the robot’s performance. This last mission will likely require some parallel program paths and use of variables. See examples and discussion here.
Mission #5. Better Line Following
Preparation: Brief students using training slides for light sensor. Discuss the idea of using the sensor reading as an average over an area and how to create an error signal.
Set up:
- A flat smooth surface and contrasting color adhesive tape.
- In middle of the area put down about 2 and half feet of tape.
- Lay down a rough square of tape about 3 – 4 feet on a side.
5a. Have the students try to write a proportional line following program and test it.
Hint The teaching slides have a proportional line follower program they could crib from, but it’s probably more complex than they need.
5b. Add sound to the proportional line follower similar to 3.d. above. Compare the two different tones.
These exercises are intended to further develop the students’ ability to execute dynamic control of the robot. There are not tremendously new ideas here, but further exploration of the concepts already worked – and with the intent to show continuing control improvement.
These challenges as a Microsoft Word file.
Light Sensor teaching slides as a file Microsoft Powerpoint file
Latest posts by Craig (see all)
- NXT exercises – One approach - 2 February 2016
- Why I like educational robots - 18 November 2013
- Area Measurement: Follow the Path - 27 May 2013
- Program structure – simulating publish and subscribe - 25 May 2013
- Pendulum mathematics - 25 May 2013