It started as just the idea of creating a robot that could help. We wanted to think of a task or chore and make it easier through the use of LEGO Mindstorms and LabView 2010 for LEGO Mindstorms. We settled on making an ice cream sundae, a task both fun to complete and somewhat of a hassle to organize.
The Robo-Sundae experiment in detail
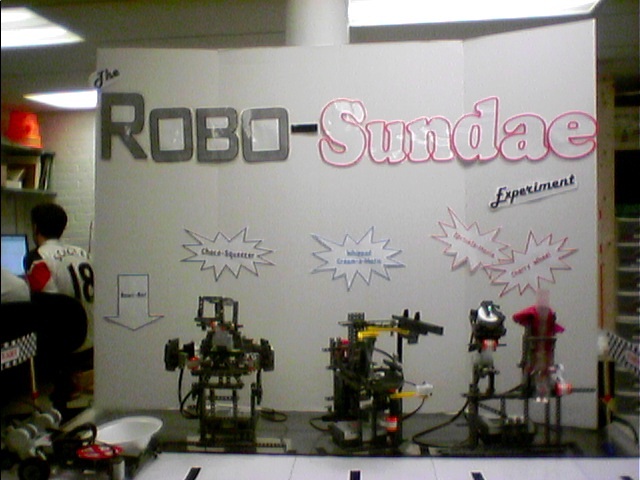 Making a sundae involves multiple ingredients, which we saw as an opportunity to split our project into manageable sections. After brainstorming the core ingredients of any good sundae (chocolate syrup, whipped cream, sprinkles, and cherries), we planned our project. We wanted the grand scheme of the process to be as simple and convenient as possible: put in ice cream, get out a sundae. Knowing this, we broke down the project into five categories: one for each topping, and one for transportation.
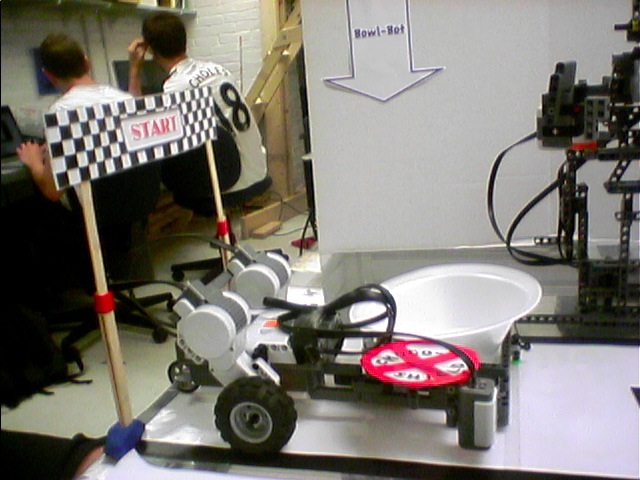
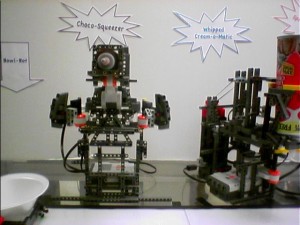
Our group went through each of the sections of our project and brainstormed what exactly would make them difficult to accomplish. Two of our toppings (whipped cream and chocolate syrup) were very heavy, and difficult to separate into smaller portions without defeating the purpose of having a reusable machine. Because of their weight, we needed to design structures that could support them while still being able to carry out their desired function. They chocolate syrup turned out to be easier to support than we first imagined, since we found a small craft bottle that could hold a moderate amount of syrup. Using this bottle, we made a manoeuvrable robot that could both dispense syrup and store the bottle in a safe position. Unfortunately, we did not have this luxury with the whipped cream can. We had to use everything at our disposal, from weighted blocks to rubber bands, to compensate for the massiveness of a whipped cream can.
 The challenge with the other two toppings would be more about the application as opposed to the containment. Small, sticky cherries and minuscule sprinkles would be difficult to manage in a repeatable and effective way. On the bright side, since both toppings are very light and compact, we were able to combine both into one “station” along our sundae assembly line. Once we had controlled (to some extent) the flow of sprinkles by covering some of the holes in the sprinkles’ container, we focused primarily on the cherries. This station proved to be the most challenging of all, and required multiple design attempts and failed ideas. Finally we settled upon an impromptu water wheel that would hold multiple cherries and control their application.
Lastly, the transportation robot would need some way of communicating with the topping robots. How would it do this? How would it carry the ice cream? Our first concern was that the LEGO Mindstorms motors are notorious for their inability to follow a straight line. Our fix for this was to have our transportation robot follow a dark line on a white track, made by us, as it traveled by each station. This way accuracy would be guaranteed.
Next, we had to decide between two methods of communication between the transportation robot and the stations: sensors and Bluetooth. Initially we tried ultrasonic sensors, but their lack of sensitivity and precision made the tasks we needed to accomplish difficult. Next we turned to wireless communication, through the built in Bluetooth devices in the NXTs. Neither of us had used this technology before, but we knew it was a challenge we had to tackle. This would also allow us to have each user customize their sundae using an elegant front panel display (seen in our blog: sites.tufts.edu/robosundae).
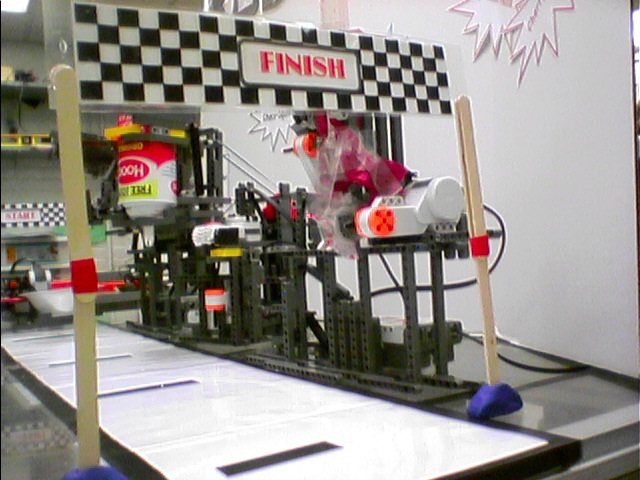 Basically, when our transportation robot reached each station (stopping on the dark line in front of it using a light sensor) it sent a message via Bluetooth to that station. Using Bluetooth turned out to be pretty frustrating and temperamental, but thankfully ultimately successful. The Bluetooth platform for Lego Mindstorms can be difficult to use, so we wouldn’t recommend it to any beginning programmers or builders. For classroom purposes, we would recommend working around Bluetooth. Elaborate timing of programs can be used, or a creative combination of different sensors—both light and sound work well.
All in all, we conquered some difficult design challenges, and had a very fun and rewarding learning experience. And we have a robot that makes ice cream sundaes.
From idea to solution
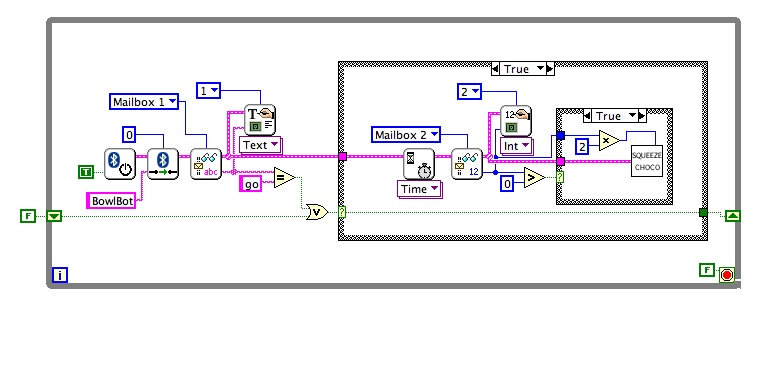
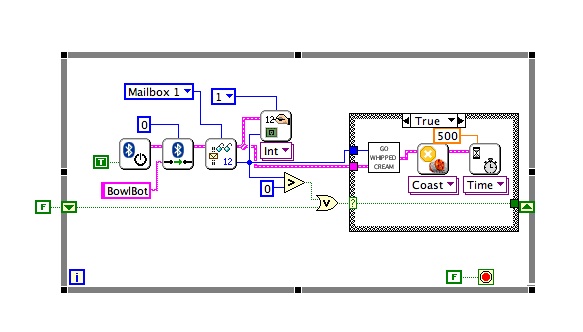
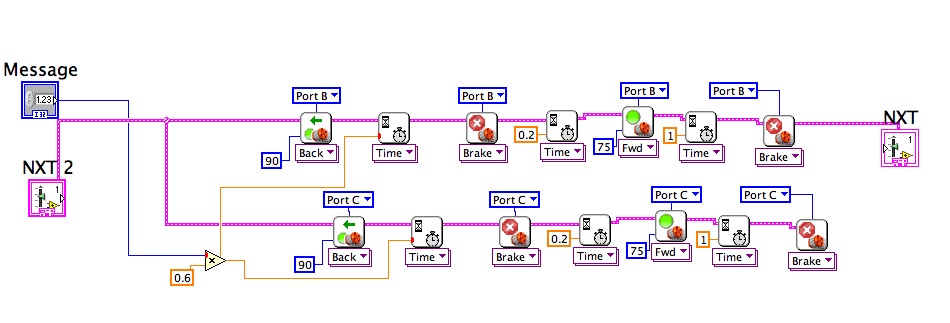
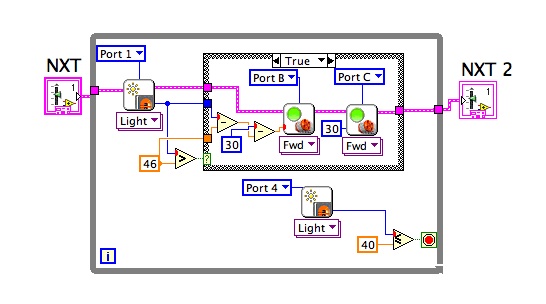
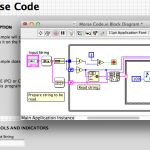
Robo-Sundae LabVIEW code
Here is a page containing pictures of all of our code used for the Robo-Sundae project.
Click on the image to see a larger version.


Try it with your class
The concept of creating a “Helper Bot” as a class can be a great framework around which to build an engineering and design curriculum. This project should take place after the students have already been introduced to LEGO construction and programming. For an upper elementary or middle school classroom, we estimate a similar project would take between 8 and 10 ho
ur-long class periods—although it could easily be extended. The class as a whole would create one big, final product: groups of two or three would be in charge of one step of the process. Below is a possibility of what the lessons could look like. The lessons mirror the Engineering Design Process.
Lesson 1: Identify the Problem
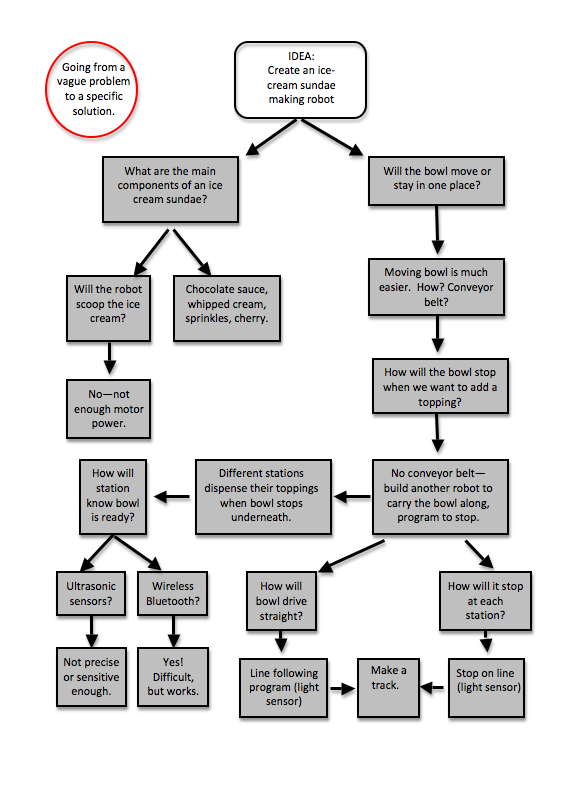
- Introduce the idea of a “Helper Bot.” Discuss the job of an engineer—to solve society’s problems and create products that make life easier. Introduce the Engineering Design Engineers find “messy,” vague problems (ex: How do you make an ice cream sundae with a robot?) and redefine them into clear, solvable ones. See the link at the top of the page for our problem definition process.
- Decide as a class what task you are going to complete. Break it down into steps and assign each group one part of the process. Keep in mind that not every task works for about 12 groups—look for something with the potential for many steps (ex: sandwich maker, shirt folder, or coin sorter.)

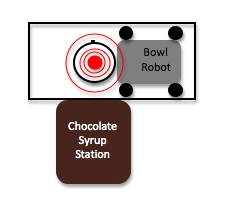
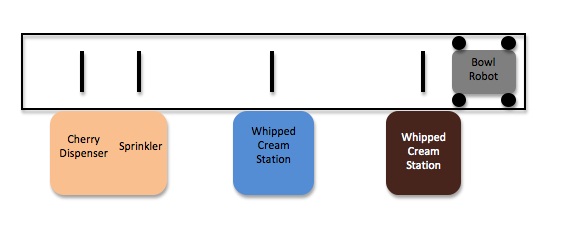
- Make your “System Guidelines” that all groups have to follow to ensure all the stations work together. For the sundae maker, this was the track—each station had to deposit the topping in the same place:
- Make a decision about what the end result will look like. Is it an assembly line? How will the stations communicate with each other? Is there a “drive robot?” See link above for a few possible setups.
Lesson 2: Research
- Discuss current ways of completing the task—what can be improved? What works well?
- Have we seen similar processes?
- Have each group decide on features for their station. A good way to do this can be a Need/Want chart—make lists of features you definitely need, and features that would be nice to include if possible.
Lesson 3: Brainstorm
- Brainstorm different ways to fulfill your goals. Quickly prototype a few if there is time. Have groups draw and agree on their initial construction idea.
Lessons 4 through 7 (adjust based on class): Construction and testing
- Discuss the importance of failing and redesigning. No idea is perfect the first time.
 Lesson 8: Sharing

- Have each group present their solution to the class.
- Assemble the “Helper Bot” and test it out. To start testing, make sure each station first works individually. Writing a simple test code (eg: perform task when I press this touch sensor) is the first step. Next test each one’s communication—does it “sense” the correct robot at the correct time? Lastly, test everything together.
There will definitely need to be changes throughout the testing process. Continue to stress that while the “first draft” of each station is done, the project may still need work. Putting it together is the hardest part. Spend the next few class periods getting all the kinks out.
The Robo-Sundae blog: sites.tufts.edu/robosundae
CEEO
Latest posts by CEEO (see all)
- Chair for Mr Bear - 21 August 2020
- Assistive Technology: Making Lives Easier - 20 August 2020
- Sturdy Tower - 14 June 2020
- Going the Distance - 21 May 2020
- GPS accuracy testing with LEGO bricks - 10 September 2015


One thought on “Robo-Sundae: The Experiment”
Comments are closed.