Both versions of the WeDo kit (2.0 and 1.0) come with two sensors. These sensors give students the opportunity to experience how robots sense the world around them.
Motion sensor
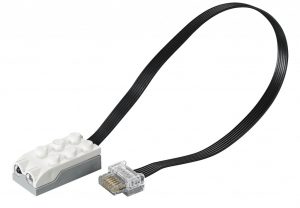
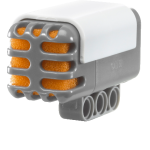
The WeDo 2.0 motion sensor (part 45304) can detect objects up to about 15 cm away, depending on the shape of the object and its reflective properties. When an object moves, it changes its distance relative to another object (such as the sensor). Consequently, the sensor can detect motion as well as measure distance. It is sometimes called a distance sensor.
The previous motion sensor (part 9583) might still be found in schools using the older WeDo 1.0 kit. One difference with the newer version is that version/software displays distance inversely. As the distance increases, it shows a smaller number. The newer version is generally easier for students to understand.
Technical details: The motion sensor is an active infrared (IR) sensor. One of the sensor’s “eyes” emits an infrared signal that bounces off an object and is detected by the other. The light is pulsed at 7 kHz. You might be able to see (and show) the flashing light using a camera phone. The sensor can work with 5 to 9 volts, with the WeDo set at 5 volts.
Tilt sensor
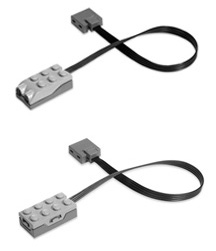
The WeDo 2.0 tilt sensor (part 45305) can detect seven positions (or orientations): tilt this way, tilt that way, tilt up, tilt down, no tilt, any tilt, and shake. One review of WeDo 2.0 suggested that the WeDo 2.0 tilt sensor responds more slowly than the earlier version and that one way to make up for this is to cause the sensor to tilt more strongly.
The original WeDo tilt sensor (part 9584) detects changes in position listed above except for shake.
Connecting the sensors
To use the sensors, connect them to the LEGO WeDo USB Hub. In turn, the Hub must be connected to the tablet using Low Energy Bluetooth. When they are attached, the computer automatically detects their presence and can use the input. Using the WeDo software, up to three hubs can be attached to a computer, allowing for more motors and sensors.
The classic WeDo 1.0 requires a tethered connection between the Hub and the computer. As with the current version, the computer dynamically detects the presence of sensors and can work with up to three hubs.
Note: The two versions of WeDo use different connectors. Therefore, the motion and tilt sensors from WeDo 1.0 and WeDo 2.0 are not interchangeable. That is, the older sensors cannot be used with the newer WeDo kit, and vice versa.
Similarly, NXT/EV3 sensors cannot be used with either WeDo 1.0 or WeDo 2.0, and vice-versa.
Using the computer’s (or tablet’s) microphone
The WeDo Software (1.0 and 2.0) can make use of the built-in microphone on the computer or tablet (e.g. iPad). For example, the software can be programmed to display how loud a sound is or to start the motor when a sound is detected.
Introducing the sensors to young students
Older students will have no problem understanding how these sensors work. For younger children, the teacher might want to link them to the senses we have as people (or animals). Ask students to name the senses. Most students will name five (sight, hearing, taste, smell, and touch) but in this case, it is useful to include the sense of balance. Then, help students see that sense and sensor are very similar words. From there, the motion sensor can be linked to sight and the tilt sensor to balance (and the computer/tablet mic to hearing). Many students will be familiar with the beeping sound when a car is backing up or when the light turns on automatically when they enter a room or approach the front door. Recalling these experiences will also help students understand the motion sensor.
WeDo sensors and Scratch
One interesting ability of WeDo is that it can integrate with the programming language Scratch. When this is done, input from the sensors can be used with Scratch. For example, a Scratch program could be set to wait for a change in tilt and when it happens, it could display on the computer, “Watch out, you are going downhill.” A plugged-in WeDo creation with a tilt sensor would cause this message to be displayed if moved in the required direction. More information can be found here.
In Scratch, the motion sensor provides a rough indication of distance where 0 (zero) is close and 100 is far. Similarly, the tilt sensor can report orientation where 0 is flat, 1 is down, 2 is right, and 4 is left. When using Scratch, only one hub can be attached. Activities incorporating Scratch would be more appropriate for older students, at least upper primary.
Wayne Burnett
Latest posts by Wayne Burnett (see all)
- Hour of Code With Robotics - 2 December 2018
- Alternative Programming Languages for LEGO MINDSTORMS - 29 November 2018
- WeDo Sensors - 21 March 2018
- What to Buy (WeDo 2.0) - 1 March 2018
- Online Training Courses - 31 October 2017

“For example, the software can be programmed to display how loud a sound is or to start the motor when a sound is detected.”
I work with wedo and i can put waiting for sound to move, but I don’t know how to calibrete de noise level for the action….How we do that?